Cregrant3D Dual Z-Axis Upgrade Kit For Ender 3


€34.99
Cregrant3D Dual Z-Axis Upgrade Kit For Ender 3 Price comparison
Cregrant3D Dual Z-Axis Upgrade Kit For Ender 3 Price History
Cregrant3D Dual Z-Axis Upgrade Kit For Ender 3 Description
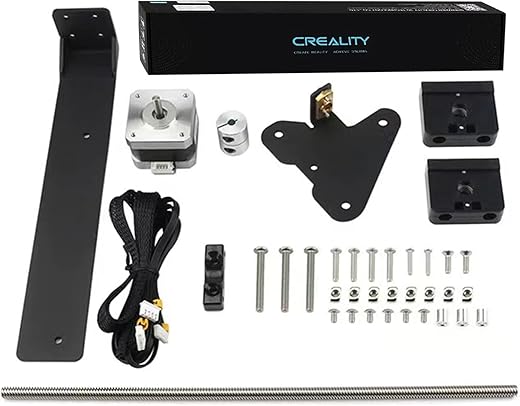
Cregrant3D Dual Z-Axis Upgrade Kit For Ender 3: Enhance Your 3D Printing Experience
The Cregrant3D Dual Z-Axis Upgrade Kit For Ender 3 is a must-have for anyone looking to elevate their 3D printing capabilities. This upgrade transforms your Ender 3 into a more efficient and stable machine. With its precise engineering and easy installation, you can ensure high-quality prints and better performance. If you’re searching for the best price for the Cregrant3D Dual Z-Axis Upgrade Kit or looking for user reviews, you’re in the right place!
Main Features and Benefits of the Cregrant3D Dual Z-Axis Upgrade Kit
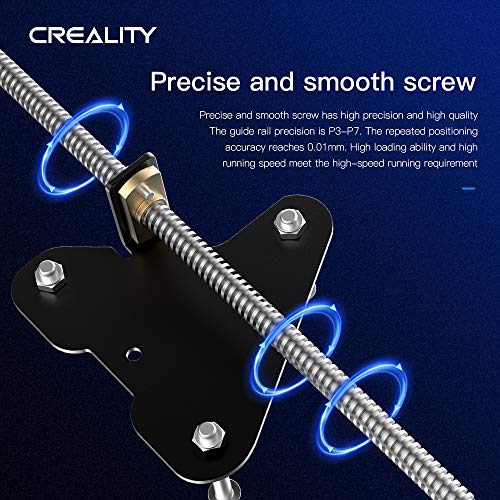
- Enhanced Stability: The dual Z-axis configuration minimizes wobbling during prints, leading to smoother and more accurate layers.
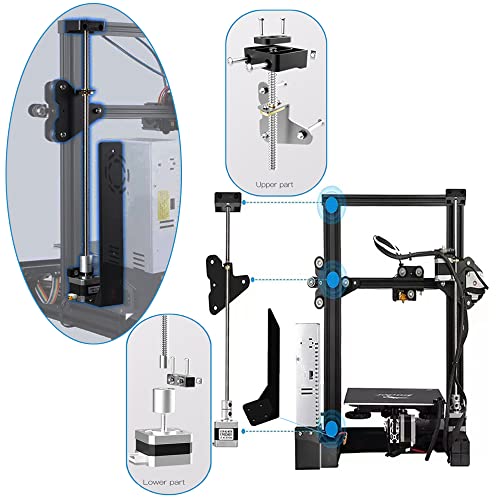
- Simple Installation: Designed for user-friendly assembly, this upgrade requires minimal tools and is suitable for users of all skill levels.
- Robust Construction: Made with high-quality materials, the kit offers durability and reliability, ensuring you a long-lasting upgrade.
- Cost-Effective Solution: Upgrading your existing Ender 3 is a budget-friendly way to enhance performance without investing in a new printer.
- Improved Print Quality: Users often report better layer adhesion and accuracy, which is crucial for detailed projects.
Price Comparison Across Different Suppliers
When it comes to pricing, the Cregrant3D Dual Z-Axis Upgrade Kit shows some variations across different suppliers. As of now, prices range from $29.99 to $39.99. Our platform allows you to compare prices easily and find the best deals available. Checking multiple suppliers can help you secure the best price for the Cregrant3D Dual Z-Axis Upgrade Kit today!
Trends from the 6-Month Price History Chart
Looking at the 6-month price history of the Cregrant3D Dual Z-Axis Upgrade Kit, the trend indicates a slight decrease in price over time. This trend demonstrates that as more enhancements are made to similar products and competition increases, you can find competitive pricing. It’s an excellent time to consider upgrading, especially with fall sales approaching.
Customer Reviews: What Users Are Saying
Customer feedback for the Cregrant3D Dual Z-Axis Upgrade Kit has been overwhelmingly positive. Users appreciate the stability it adds to their Ender 3, which directly translates to improved print quality. Many users highlight:
- “The installation was straightforward and took about an hour.”
- “My prints have never looked this good! Highly recommend!”
- “This upgrade pays for itself in the quality of the output.”
However, some users have noted drawbacks, including:
- A few users faced a learning curve during installation, particularly those new to 3D printing.
- Some found the additional weight slightly affected their machine’s portability.
Explore Unboxing and Review Videos
If you’re eager to see the Cregrant3D Dual Z-Axis Upgrade Kit in action, be sure to check out various YouTube unboxing and review videos. Many content creators showcase the installation process as well as the before-and-after print quality. This is a fantastic way to gauge how this upgrade can expand your 3D printing possibilities.
Why Upgrade with the Cregrant3D Dual Z-Axis Kit?
The Cregrant3D Dual Z-Axis Upgrade Kit For Ender 3 is designed to significantly improve your 3D printing experience. With features that emphasize stability and ease of installation, it’s an ideal choice whether you’re a beginner or an experienced user. The positive customer reviews and backed insights into price comparisons accentuate the value this product brings. Invest in this upgrade to take full advantage of your Ender 3’s potential!
Don’t miss out; compare prices now to get the best deal on the Cregrant3D Dual Z-Axis Upgrade Kit For Ender 3!
Cregrant3D Dual Z-Axis Upgrade Kit For Ender 3 Specification
Specification: Cregrant3D Dual Z-Axis Upgrade Kit For Ender 3
|
Cregrant3D Dual Z-Axis Upgrade Kit For Ender 3 Reviews (13)
13 reviews for Cregrant3D Dual Z-Axis Upgrade Kit For Ender 3
Only logged in customers who have purchased this product may leave a review.


ianb –
The reason for buying this is improved prints. It achieves that great. However.
If I hadn’t watched a YouTube video on installation it would be on its way back to amazon. If you go to “Defpom’s Electronics Repair” channel and fast forward to 21 minute mark this is the exact problem I had.
I also encountered two washers on one side of the brass piece which may be how they tried to compensate at factory? Didn’t work for this one though.
The other problem I had was about the lack of current which doesn’t appear to be a big deal yet but research issues pulled up something called VREF voltage.
The YouTube channel “TH3D Studio” gives instructions and the reason you might want to change it. I haven’t so far but I will if I notice problems above the 100mm Z step as that’s where they say it could become noticeable.
It will require a multimeter if you do decide to change it. This step I am a little weary of so that’s why I’m not going there yet as the disclaimer is that a misstep with a screw driver could damage the board. However he mentioned something about ceramic or ceramic encased screw drivers that I’m pretty sure are on amazon. Haven’t looked.
WARNING Do these changes at your discretion. Their both delicate procedures, the first one needs just slight tweaking, but the VREF requires fiddling with the motherboard.
In conclusion great prints but less than great installation and could possibly require a tweak on motherboard(but not needed yet, maybe if I ran it non-stop, but I don’t)
A. Dalton –
Pretty happy with this kit. I only went with it for the sprite carriage, but I’m pleased with the quality of the rails. the instructions weren’t super detailed, but they were straight forward enough for the install to be painless. My one grip is that these rails do not come lubed AT ALL. They do come with a tube of lube, but the instructions do not say anything about lubing them or how to. Definitely lookup a video if you aren’t familiar how to proper lube the rails, and make sure you do a good job before using this kit.
Davis –
Good quailty and nice fit!! One tip! If you are intending on using a belt in conjunction with this kit, print risers for the motors so that the lead screws will stick up above the top of the “stabilizers” that come in the kit. That way you have enough rod for the belt pullies to fit on top. Thingiverse has a file for 1cm riser that works perfectly. This picture is without them as I didn’t think about it until after I installed it. Now I will have to print them and go back and reinstall. Here is the spacer link(add this to the end of the thingiverse URL right after the “.com” Amazon may not allow a full link):
“/thing:5367399”
Happy printing!!
Amazon Customer –
If your z motors don’t sync, or jam up, remove the lead screw stabilizers at the top, in fact just don’t use them in general. Lead screws being forced perfectly upright will jam each other, they are meant to be freestanding. They ought to remove it from the kit entirely
Harry N. Sharphead –
This kit is a must for my Ender 3 V2 ! After 1 week of struggling with the printer to keep its platen level with the original springs, I received this kit and all my problems were resolved! The plate does not move any more, no risk of touching the plate and that the screws are unscrewed by themselves = WOW!
A must for every 3D printer !
chase –
Used these items to make my ender 3 better
Patrick –
I have an aftermarket belt tensioner for my Ender 3. The rail is too long to work with it. Like another reviewer stated, it barely fits with the stock tensioner. An aftermarket will most like not fit after the rail is installed.
You may end up sliding the rail so far to the left that it presses your end stop. You might have to remove the end stop. You can solve that by printing a X-Axis End Stop relocator beforehand (if this is your only printer) just in case. You can Google it or hit up Thinkaverse for the stl file.
I did not print the relocator and ended up hot gluing my end stop on top of the stepper enclosure temporarily so that I can print the relocator. Then I’ll properly move it afterwards.
The rail install is straight forward and easy. I was also installing a Sprite Pro that came with its own mounting bracket, so I did not use the included brackets. I’ll run a test print tomorrow, but I foresee no issue as the Sprite Pro glides effortlessly along the rail. Very nice product.
Patrick –
Easy to install and it works amazingly well. Very happy with it! Allowed me to install direct drive without worry.
Tallen –
Prevents the gantry from drooping, more accurate prints.
I did not install the upper Z-axis bearings, not necessary, or possible with the addition of support bars from the uprights to the base.
Kevin –
Not hard at all to install. Works well once it has been installed. Has good directions.
chase –
Easy to install, needed adjustments on the original Z screw, then worked great!
Ewok –
This is a very worthwhile modification, it made my horizontal bar rock solid. The reason I got this was because I could never get the guide wheels on my carriage tight enough to track correctly. I noticed that during bed leveling when there was a lot of movement in the z-axis that the motor side of my horizontal bar would start moving slightly before the other end. This second motor and screw set stopped this problem entirely. They also included some screw stabilizers for both sides of the printers vertical arms which was a nice touch. I did need to very slightly shim the new motor away from the vertical arm because it was binding up a little at the bottom of travel.
Another reason I got this was to help support the Sprite Pro Extruder/Print head I added. Not sure if I really needed to but it made sense because of how much bigger and heavier this but of equipment was compared to the original print head the Ender 3 Pro came with.
The only reason I didn’t give this a 5 was the need to cut the ends off the carriage mounting screws so it would fit my Ender 3 Pro. I thought they might consider at least putting some shorter screws in the package to eliminate this problem for the future.
Eric –
Not difficult to update printer. You do need to partially disassemble the X-axis but that is to be expected. I used some online prints for a holder to mount the linear rail before it was screwed on but I do not think that is needed. The X-axis moves super smooth after a quick break-in, maybe 10 to 20, X-axis full axis slides.
BUT your Y-axis is now off my 12 MM or so which does not mater if you do no print near the edge but using mesh leveling goes to the edge of all axis and will try to go off the edge of the Y axis in the front. To fix this I unmounted my Y-axis zero switch, it is screwed into the rail, and used standard screws and rail nuts to move it about 9MM forward and all is well. Tried 12MM but that ended up having the Y-axis move a little to far the other way.