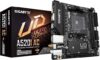
Gigabyte A520I AC Mini-ITX Motherboard

Original price was: €119.99.€109.99Current price is: €109.99.
Gigabyte A520I AC Mini-ITX Motherboard Price comparison
Gigabyte A520I AC Mini-ITX Motherboard Price History
Gigabyte A520I AC Mini-ITX Motherboard Description
Explore the Gigabyte A520I AC Mini-ITX Motherboard
The Gigabyte A520I AC Mini-ITX Motherboard is an exceptional choice for anyone looking to build a powerful, compact PC. Designed with the latest technology and user-friendly features, this motherboard provides an outstanding foundation for your next gaming or workstation setup. Let’s delve into its key features and specifications, highlighting why it is one of the top choices for enthusiasts.
Key Features of the Gigabyte A520I AC Mini-ITX Motherboard
- RAM Compatibility: Supports DDR4 SDRAM, enabling high-speed memory operations for improved performance.
- Wireless Connectivity: Built-in Bluetooth allows for seamless wireless communication, perfect for connecting to peripherals without clutter.
- USB Ports: Features two USB 2.0 ports, providing ample connectivity for your essential devices.
- Compact Design: With dimensions of 8.74 x 7.44 x 3.07 inches, it fits perfectly into smaller cases while maintaining robust capabilities.
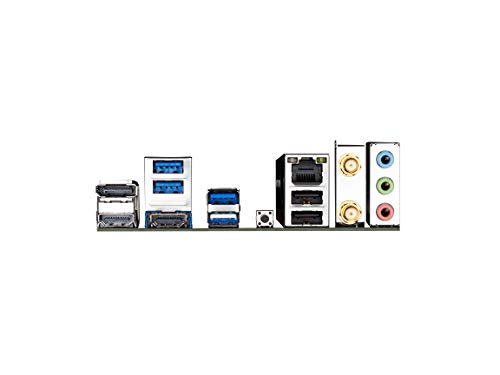
- Total HDMI Ports: Two HDMI ports for dual monitor setups or connecting to your home theater system.
- Optical SPDIF Connector: Ensures high-quality audio output for a superior sound experience.
- SATA 3 Support: Enhances data transfer speeds for your storage solutions, improving load times.
- Weight: At just 0.035 ounces, this lightweight motherboard is easy to handle during installation.
Price Comparison Across Leading Suppliers
When considering options for the Gigabyte A520I AC Mini-ITX Motherboard, users will find a competitive landscape. Prices vary across different suppliers, so it is crucial to compare them before making a decision. As of now, the price can be found ranging from $80 to $120, depending on the retailer. Our price comparison tool offers a straightforward way to determine the best deals available across the web, ensuring you get the most value for your money.
Trends from the 6-Month Price History Chart
Reviewing the 6-month price history for the Gigabyte A520I AC, we’ve noted a few interesting trends. Initially, the price peaked at $130 but has gradually stabilized around $100. Such insights are beneficial, helping buyers to decide the best timing for their purchase.
Customer Reviews Summary
Customer feedback on the Gigabyte A520I AC Mini-ITX Motherboard reflects a generally positive reception. Users have praised its robustness, ease of installation, and reliable performance in various applications, from casual gaming to professional work tasks. Notable positive reviews highlight:
- Excellent thermal management, keeping systems cool during intense usage.
- Smooth operation and compatibility with a wide range of CPUs.
However, some users have reported minor drawbacks, including:
- A limited number of USB ports, which may require the purchase of additional USB hubs for those with multiple peripherals.
- Some concerns about BIOS updates, where users had to manually update to ensure optimal compatibility with the latest processors.
Engaging Video Reviews and Unboxings
For potential buyers wanting to see the Gigabyte A520I AC Mini-ITX Motherboard in action, several YouTube reviewers have showcased unboxing experiences and performance tests. These videos add valuable context and can help you visualize your potential setup. Viewing these can further assist in your purchasing decision.
Final Thoughts on the Gigabyte A520I AC
The Gigabyte A520I AC Mini-ITX Motherboard stands out as a stellar choice for builders seeking compact yet powerful hardware. Its features, from Bluetooth capability to dual HDMI outputs, cater to a variety of needs, whether for gaming or productivity. The price fluctuations highlight the importance of comparing options across platforms to secure the best deal.
Overall, with its high-performance capacities and modern design, this motherboard is a worthy investment for any tech enthusiast. Don’t miss out on securing your ideal setup—grab the Gigabyte A520I AC Mini-ITX Motherboard today!
Compare prices now!
Gigabyte A520I AC Mini-ITX Motherboard Specification
Specification: Gigabyte A520I AC Mini-ITX Motherboard
|
Gigabyte A520I AC Mini-ITX Motherboard Videos


Gigabyte A520I AC Mini-ITX Motherboard Reviews (13)
13 reviews for Gigabyte A520I AC Mini-ITX Motherboard
Only logged in customers who have purchased this product may leave a review.


Amazon Customer –
Does the job nicely. I like how wifi and Bluetooth are included. Only 3 fan headers including the CPU fan (not great).
For an a520 motherboard, BIOs is great—some undervolting options included as well as an XMP setting.
M. Kane –
After a number of system upgrades, I found myself with a DDR4 memory kit, an ITX case and a 5600G without a home. I bought this board and a boot drive to assemble a low power system. Everything I put in was recognized out of the box, Windows install was straightforward and I’ve had zero issues with it.
It’s got the a520 chipset, so it’s limited to 26 lanes of PCIe gen 3. It doesn’t support overclocking and has a fairly basic VRM, so it’s not the best choice for gaming. It only has 2 memory slots, one PCIe slot and one M.2 slot so expansion options are limited. If you understand it’s limitations and can live within them, it’s a great board.
For this system I have no need to overclock and the 16 Gb of memory I have in it is all it will ever need. It recognized the XMP memory timings and runs it at the advertised 3600 mHz. Sitting here typing this review while streaming video from a media server it’s drawing 31 watts, including the monitors. I can use it for light gaming and I have 6 TB of storage on it backing up some less important stuff. If you’re building a gaming system I’d spend the extra money for a more fully featured B550 or X570 board, but for a fast, low power desktop this is an excellent choice.
Soarwitheagles –
So far everything has been great. Mine shipped with the latest bios f15( bios update utility would go any farther).
I’m having some weird stuff going on with my nvme ssd. Might be because of the drive I’m using ( crucial p3 1tb pcie x3) but read speeds are low. Not sure why though. Tried getting all drivers loaded and that helped a little. It might be the drive I bought too no idea. Other wise the motherboard is great. The mother board power connector is shifted down from the usual spot so that helped me with my nouvolo steck case. I love having three fan headers too. Downside is the 3rd connector sucks because you need an adapter cable to use it ( it comes with it). Just make sure you don’t loose it hahaha.
Currently I am running a 5600g, 16gb of ddr4 @3200mhz, and a rtx 3090. Having the GPU and cpu water cooled in a custom loop. Powered it with a Corsair sf750. It’s my mini portable rig when I wanna game at a friend’s house, host a server, or play in my bedroom( bigger more powerful rig is in the living room). Mini itx boards are the best!
No RGB on the board itself to indicate anything for post. But it does have headers for RGB and a speaker.
Like some other reviewers had some issues with a different set of ram running at xmp. But that kit might be a dud. It doesn’t run anymore in my main rig. It’ll be designated to package opening duties.
Anthony French –
With a motherboard coming in at about $100, I didn’t expect it to have a whole lot. But I was surprised. USB-C on the back, built-in WiFi 6, an NVME slot as well as 4 SATA ports, and a PCIe x16 slot. Having more RAM slots would be nice, but cramming that into an ITX board would be painfully difficult. Two slots are enough. I still prefer MSI BIOS over this, but it’s still easy to use and does everything I need it to. I’d say it’s a pretty great motherboard.
John –
Set up an extra small PC using this. Cheap for ITX. Really tiny. Never felt anything is amiss. AM4 still rocks, especially with cheap processors and cheap RAM available.
A515 –
Just wanted a small form factor motherboard, to do the job, and it delivers. Pairs great with my 5600G and handy in a small itx case.
Anthony French –
Out of the box i could enable pbo but after updating the bios that feature seems to be gone :(, no problems using both hdmi ports at the same time with an 5300G.
Leo –
I have built more computers in the last 25 years than I can remember. I lost track of how many I built.
This newest build had very specific criteria: it had to be mini-itx, had to be 100% reliable, look somewhat ok and simply get the job done. This build was to be used as a dedicated rig for an amateur radio operator using the Hermes Lite 2 SDR radio. It had to have a small footprint.
I paired it with an AMD 5700G so I did not need to install a video card on the motherboard.
This motherboard fit the criteria and I must admit, I am super happy with it so far. The rig has been online now for a couple of months and no issues whatsoever. We did upgrade the BIOS to the newest version.
For the price, performance and quality, I give it an A+++.
I will update this review if something goes wrong with this motherboard.
Austin –
So everything went very well with my bills except where I was missing one USB 2.0. I wish I had more points but that’s my own fault not being specifications so I can’t blame them. Is it building a computer please read how many ports of each are on there to make sure you have enough. My build was complicated most people aren’t building something like I did. All in all I will recommend this. five stars for sure
Cryerborg –
——- Actualización 21/10/2023: El fabricante ya ofrece la compatibilidad de este producto con Gráficos Integrados de Ryzens 3000 (R3 3200G y R5 3400G). Tal compatibilidad no se ofrecía antes, pero actualmente se puede apreciar en la web oficial de producto. ——-
Tarjeta Madre (TM) perfecta para personas no interesadas en overclocking de CPU/iGPU, sin embargo permite overclockear RAM. Su PCIe 3.0 la hace conveniente para gráficos integrados o solo dedicados que usan PCIe versión 3. TM destaca por el socket CPU ubicado no en el centro, sino desplazado unos mm al borde, que puede ser punto a favor para instalar disipador de CPU voluminoso.
La TM Gigabyte A520I AC se probó con:
— CPU: Ryzen 5 5600G con gráficos integrados
— Disipador CPU: Noctua NH-L12 Ghost S1 (66mm de alto)
— Gabinete: Silverstone ML06B
— Memoria RAM: Crucial Ballistix BL2K8G36C16U4R (39,2mm de alto)
— Fuente de poder SFX: Silverstone ST30SF-V2 300W
— SSD SATA
— W10 LTSC 1809
Referente al sistema de actualización de BIOS (sin CPU ni RAM) Q-Flash PLUS:
Según mi experiencia Q-Flash PLUS funciona bien y es la salvación para los que no disponen de CPU de generación anterior. Hay que tener en cuenta que con Gráficos Integrados, BIOS de TM por defecto tiene habilitado solo 1x puerto de Video: conector HDMI_1 (de los bordes azules, debajo de 2x puertos USB 3.0). El segundo HDMI y Display Port por defecto están INACTIVOS y no van a dar imagen (esta información no está en ningún manual de producto). Ya conectado al monitor por HDMI_1, con imagen en pantalla y una vez dentro de BIOS, al forzar gráficos integrados se habilitan los 2 puertos de Video restantes. Cada vez que BIOS se pone a valores por defecto – queda activo únicamente el puerto HDMI_1. Al final de reseña pongo consejos para actualizar BIOS de este producto.
Referente a posibilidad de limitar TDP de CPU desde BIOS:
Ryzen 5 5600G (sin overclocking) tiende a subir temperaturas mucho y de golpe. La TM permite limitar TDP de CPU a 45W desde BIOS mediante perfiles configurados por el fabricante de TM (Settings->AMD CBS->NBIO Com. Options->SMU Com. Options->System Config. AM4). Al aplicar perfil de 45W, frecuencias de los núcleos de CPU se reducen solo 200MHz, pero las temperaturas bajan unos (!) 11°C. Sin embargo al limitar TDP a 45W, según soporte Gigabyte, es más aconsejable no usar perfiles XMP y overclocking de memoria RAM. Aparte de la posibilidad de limitar TDP, la TM permite hacer el típico underclocking/undervolting de CPU.
Consumo energético de todo el Sistema (según Wattimetro en el enchufe de corriente):
Sin limitar TDP de CPU y con RAM a 3600MHz (XMP), todo el Sistema en carga de CPU a 100% (stress test AIDA64) consume aprox. 100W en total. Limitando TDP de CPU a 45W y con RAM sin XMP, todo el Sistema en carga de CPU a 100% consume solo aprox. 75W en total.
Conclusión: El producto ofrece buena calidad y funciona perfectamente con Ryzen 5 5600G siendo muy conveniente para sistemas Compactas.
Consejos para actualizar BIOS de TM Gigabyte A520I AC con herramienta Q-Flash Plus (sin CPU ni RAM instalados):
1. Según mi consulta con Soporte Gigabyte, la manera más segura y conveniente de actualizar BIOS de este producto – es usando Q-Flash Plus. Pero hay que entender que tal actualización de todas maneras es un riesgo, ya que si se interrumpe la luz – TM puede quedar inservible.
2. Es imprescindible ver con antelación el manual-video genérico de Q-Flash Plus en la web oficial de TM.
3. Durante el proceso hay que controlar en cada momento el suministro de corriente a TM. Cualquier conexión de cables/componentes a TM – realizar solo con corriente apagada desde Fuente de Poder. Y al contrario, cuando el proceso de actualización de BIOS se inicie – procurar que el suministro de corriente no se interrumpe y no se vaya la luz.
4. Es mejor usar una memoria USB versión 2.0 más básica posible. Antes asegurándose que es totalmente funcional (que al conectarla a otro PC, siempre se reconoce sin problemas).
5. Es necesario formatear la memoria USB en cuestión con “file system”: FAT32 y “allocation unit size”: BY DEFAULT, antes de grabarle el fichero de BIOS.
6. Es importante modificar correctamente el nombre de fichero de BIOS (previamente descomprimido en otra PC y grabado en la memoria USB) – tal como lo indica el manual-video genérico de Q-Flash en web oficial.
7. Es aconsejable que la memoria USB que se va a usar – tenga incorporado el indicador LED propio para mejor visualización del proceso. Así, en el momento de conectar la memoria al puerto USB blanco en TM (conectores 24-pin (TM) y 8-pin (CPU) de Fuente de Poder conectados y con corriente, pero sin CPU ni RAM instalados) – el indicador LED propio de memoria USB empezará a parpadear LENTAMENTE – que es una buena señal. Cuando posteriormente se pulse el botón Q-Flash Plus en TM, el indicador LED propio de memoria USB empezará a parpadear RAPIDAMENTE. En paralelo con esto parpadeará el indicador LED de Q-Flash incorporado en TM – significando que proceso de actualización ha empezado (tarda aprox. 3-4 minutos y mientras se ejecuta es vital NO apagar la corriente ni desconectar cables).
8. Cuando la actualización de BIOS termine (se apagarán todas las LEDs), es aconsejable quitar la corriente de Fuente de Poder antes de instalar la RAM y CPU.
Joshua T. –
The first board I got had some issues. I was having trouble getting the build to post. After some testing it turned out to be a malfunctioning DIMM slot. Both RAM sticks working, but only one DIMM slot.
There’s another review about the USB3.2 connector coming off the board: and it will. The tolerance is pretty tight for the front I/O on a Thermaltake case. The connector can be carefully reinstalled onto the motherboard pins.
Returned the first board and ordered a second. The second board is working perfectly fine. BIOS was updated to f18, so the 5000 series CPUs will work out of the box.
First one, 1 star.
Second one, 5 stars.
Average, 3 stars.
A515 –
Ryzen 5 3400G で使用。特に問題なく稼働中。
メモリはKLEVV DDR4 3200 8GB x 2枚。デフォルトだとJEDECプロファイルで 2666 になっているので、3200に変更。こちらも問題なくmemtestクリア。
mini-itxの中でもオンボードで3面のマルチモニタ出来るのが非常によい。
マニュアルは入っていないので、PDFをダウンロードしないといけない。
Cryerborg –
Very durable