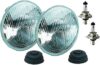
HELLA Vision Plus 165mm 12V Conversion Kit
$83.84
HELLA Vision Plus 165mm 12V Conversion Kit Price comparison
HELLA Vision Plus 165mm 12V Conversion Kit Price History
HELLA Vision Plus 165mm 12V Conversion Kit Description
Discover the HELLA Vision Plus 165mm 12V Conversion Kit
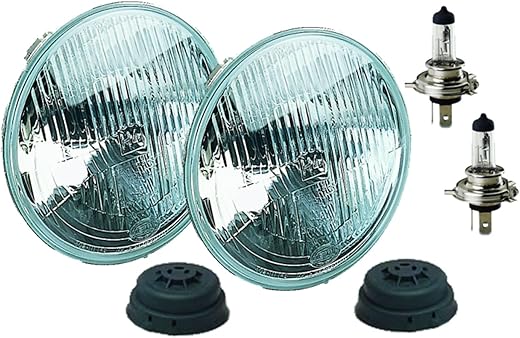
The HELLA Vision Plus 165mm 12V Conversion Kit is your go-to solution for enhancing your vehicle’s headlights. Designed with precision and built for performance, this conversion kit improves visibility and safety, making nighttime driving more comfortable. With its advanced features, it’s a perfect upgrade for anyone seeking to enhance their driving experience.
Key Features and Benefits
- High Beam Performance: The HELLA Vision Plus kit is engineered to provide superior high beam illumination, giving you increased visibility during night driving.
- Vehicle Specific Fit: Ensuring compatibility with your vehicle, the kit is designed for a seamless installation process. No need for modifications—just plug-and-play!
- Durable Construction: Made with high-quality materials, the kit’s exterior is machined for strength, ensuring long-lasting performance even under tough conditions.
- 12 Volts Power: This kit operates efficiently at 12 volts, making it suitable for a wide range of vehicles while still maintaining optimum brightness.
- Easy Installation: The conversion kit includes everything you need for installation, allowing you to enhance your car’s lighting system quickly and easily.
Price Comparison Overview
The HELLA Vision Plus 165mm 12V Conversion Kit is competitively priced across various suppliers. Depending on where you shop, the prices can vary significantly, so it’s essential to compare before you buy. You can find listings ranging from $45 to $75. Our price comparison tool helps you find the best deal effortlessly.
6-Month Price History Trends
Over the past six months, the price of the HELLA Vision Plus kit has shown some fluctuations. Initially retailing at around $70, the price dropped to a low of $45 during sales promotions. Currently, it hovers around $55–$60, indicating stable pricing with potential for future discounts.
Customer Reviews Summary
Customer feedback highlights the HELLA Vision Plus Conversion Kit’s impressive brightness and ease of installation as key advantages. Users have noted a marked improvement in nighttime visibility, which enhances overall driving safety. However, some reviews mention concerns regarding the longevity of the bulbs compared to conventional options. Most users recommend this kit for its performance and value for money.
Unboxing and Review Videos
To get a better understanding of what to expect, we encourage you to check out related unboxing and review videos available on platforms like YouTube. Many enthusiasts provide detailed insights, showcasing the installation process and real-world performance of the HELLA Vision Plus kit. These visual aids can greatly enhance your purchasing decision by giving you a firsthand look at its features in action.
In summary, the HELLA Vision Plus 165mm 12V Conversion Kit is a high-performance upgrade designed to elevate your vehicle’s lighting experience. With its vehicle-specific fit, durable construction, and excellent high beam capabilities, this product is a great investment for safety-conscious drivers. Utilize our price comparison tool to find the best deals on this essential automotive accessory.
Don’t miss out on improving your nighttime driving experience—compare prices now!
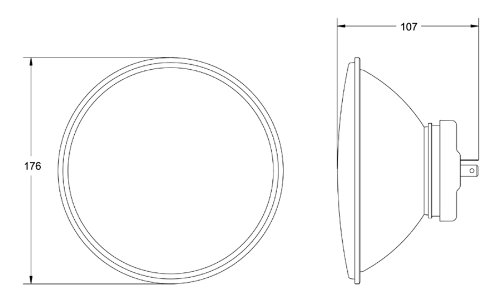
HELLA Vision Plus 165mm 12V Conversion Kit Specification
Specification: HELLA Vision Plus 165mm 12V Conversion Kit
|
HELLA Vision Plus 165mm 12V Conversion Kit Reviews (7)
7 reviews for HELLA Vision Plus 165mm 12V Conversion Kit
Only logged in customers who have purchased this product may leave a review.
TBurger –
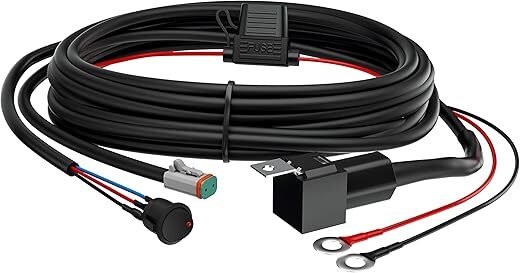
Over time I’ve noticed that the headlights on our Jeep Cherokee were getting pretty dim; this is apparently a common problem. The original equipment was sealed beam technology and though the headlights weren’t the original ones, they had been replaced with the same type and so long ago that I can’t remember when. Better technology is now available and some research indicated that the lights can be replaced with fixtures that use halogen H4 bulbs. I chose the DOT approved Hella fixtures and lamps. My research also indicated that our tired old Jeep’s wiring was not up to the higher current these lamps would draw so a “Dual High Low Beam Headlight Relay Wiring Harness H4/9003 With High Heat Ceramic Plugs” by Octane Lighting was also ordered and installed before installing the new headlights – a separate review has already been submitted. It was also necessary to replace the switch on the dash.
The first package arrived with the wiring harness and headlight – singular. I goofed and ordered a lamp instead of a pair of lamps; my mistake. The new wiring was installed while waiting for the second lamp to arrive.
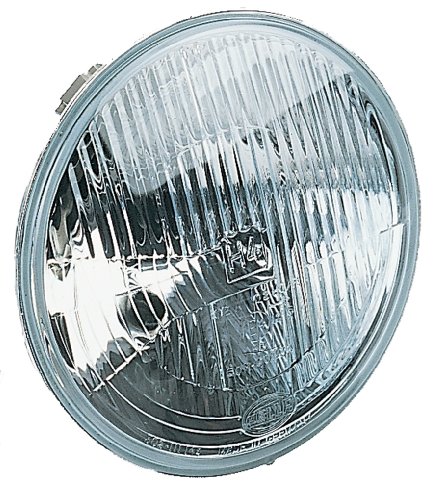
The headlamps came packaged in cardboard cartons, and were held safely in place by two formed cardboard brackets. The glass is clear with crisp edges and the required DOT and three small posts molded in. The base appears to be cast aluminum with the reflector surface brightly polished. The H4 lamps were already installed and are held in place with the standard twin spring wires and tabs. A heavy rubber grommet fits over the lamp electrical posts. At first it seemed that these fixtures were a bit deeper than the originals, but comparing the old and the new side by side I find that they are the same dimensionally. I was also a little concerned that they weren’t too well sealed since all that holds the grommet down is the friction over the terminals, but during installation I noted that the grommet contacts the adjusting pan and is squeezed tight when the mounting screws are installed. Installation was easy; they went right in, fit fine, but did require a bit of adjusting to get the beams lined up as before.
The new wiring and headlights are a great improvement. The lights are bright white and the pattern is clear and sharp. As a comparison, the fog lamps were replaced earlier in the year and were a lot brighter and produced much more light than the old headlights. After the upgrades the fogs are now completely drowned out by the headlights and simply fill in the area below the beams as they did when the vehicle was new. The high beams are dazzling – these are DOT approved parts, not off-road high wattage lights, and are aimed per the manual.
Overall this upgrade is a success and I’m pleased with the crisp pattern and white light they produce.
JMJR –
My wife’s 2004 Jeep Wrangler TJ had absolutely atrocious factory sealed beam headlights, and her Jeep only has 40000km on it, so it wasn’t even that the headlights were worn out or faded. They were so bad, one very foggy evening we had to have her headlights and fog lights on, and could still barely see the pavement marking lines 50 feet in front of her car. It was truly scary and we were crawling along roads we normally drive at 90km/h during the day.
Fed up with her terrible OEM Sylvania headlights, I went searching for an upgrade that would install cleanly and not be insanely expensive. After looking at some very expensive and cheesy looking LED headlights, as well as some cheap plastic lens equipped conversion headlights, I settled on these Hella conversion housings. Hella is a very well known and respected automotive lighting brand, and I really liked that this kit included everything we needed and had glass housings, rather than cheaper plastic housings. Of note, this kit is correct for left hand drive vehicles sold in Canada and the USA, this is not the right hand drive kit that would be used in England or Japan.
Installation is very easy
-pop out the old sealed beam bulbs
-being careful not to touch the glass of the new H4 bulbs, place them into the new housings and secure them with the spring clips (a wiring pigtail is NOT needed, H4 bulbs use the same connector as sealed beams)
-firmly press the included rubber cover over the end of the bulb connector until the prongs stick all the way through it (you must press firmly, you DO NOT need to cut the cover, it is meant to fit snugly and is made properly)
-connect wiring to prongs on H4 bulb
-reinstall bulb housing into vehicle grille and reinstall trim ring if your vehicle has one
I wish I had taken a before and after picture, because these new bulbs blow the only headlights out of the water! The conversion housings and provided bulbs put out WAY MORE light than the Sylvania sealed beam headlights my wife’s Jeep originally came with, and we now feel much safer driving it at dark. Previously, we would tend to avoid driving the Jeep at night and use my car because it is newer and has much better headlights, but now the Jeep can safely light our way. I also like that the conversion headlight lenses are flat, compared to the domed lenses over her old sealed beam headlights. The flat lenses look more modern and update the classic Jeep Wrangler styling a bit.
Anthony –
Se ven muy bien, llegaron con focos general electric, veamos cómo se portan. Para sustituir los que se robaron de una ford F-100 79. Los redondos son para camiones ford F-600, no traen focos aunque la publicación menciona que sí se incluyen
Ya se han instalado, se sustituyeron los focos por unos Sylvania led y el resultado es muy agradable tanto estética como funcionalmente.
Los redondos dan una luz clara y un haz bien definido, camión Ford F-700 año 74
JMJR –
1972 Chevy C10 headlight upgrade. These fitted perfectly into the Stock headlight buckets & with a replacement H4 harness installed it was a” plug & play “ swap
Daniel arzola –
Alisan mejor que unos led
T. Patocka –
It isn’t everyday that something so simple as a set of headlights can bring me sheer joy. These Hellas did just that! I’ve owned my 2001 Jeep Cherokee Sport (XJ) for about three years now and for some reason or another just drove it daily with the standard halogen headlights that came with it. I rarely contemplated looking for something brighter or better and to be honest with you, I didn’t even know this HB2/HB4 conversion kit even existed.
If you are a Cherokee XJ owner, you know that the headlights are barely bright enough and I frequently would flick on my brights while driving to work so I could safely see. A fresh paved road, during any kind of precipitation, rain/snow would usually result in me using the high beams. Anyway, I thought I would give these a shot. I wanted to buy a brand I recognized and wanted Amazon’s ease of return just in case I wasn’t happy, so I went with these Hellas. I’m going to explain what I did for my XJ install in a minute, but to sum up my experience now that I have had the opportunity to test them out in the pitch black, I’m happy to report that they are absolutely fantastic.
They remind me of the H4’s in my Kia Spectra. They fill the road up with light and have some pretty distinct, strong beams that you will notice that light up the center. Another big difference that I noticed was that road signs and the reflectors people put on their road sides to mark their driveway (anyone who lives in a small town/rural area or has ever ventured out into the country knows what I am talking about) are lit up way brighter than they were before. I was even thinking about changing out my wiring harness for the headlights, another $125 investment but for now I am going to hold off as I am completely satisfied with this conversion set.
Yeah, $80 stings the wallet a bit, especially for Cherokee drivers that tend to be frugal and drive their XJ because they are dirt cheap to maintain, always start and are very easy to fix, but the safety factor should not have a dollar sign put on it. They work great and you can replace the bulb itself (a standard Hella HB2/H4 type) for around $8 each here on Amazon. I was paying at least $14 at my local Walmart for each lamp (Sylvania or Wagner Halogen) when they would burn out, which has only happened once but when you go to buy a replacement, there really isn’t much in terms of on the self selection.
Here is how I changed my old lamps for the HELLAs on my 2001 Jeep Cheorkee…
1. In your tool box, I would recommend one of those multi-bit screw drivers with an extension bar to make it easy to reach the screws on the unit as they are set back just a bit.
2. Remove the two black screws from both the left and right side molding that surrounds the headlight and front amber lamp. Pop out the molding, it is held in place by two tabs on the bottom.
3. Shoot each screw (there are 4 of them which keep the aluminum trim piece around the front of the headlight) with some WD40, silicone lubricant or something that you will actually be able to remove the screws out of the aluminum trim that surround the headlight. My screws were slightly rusted and took a lot of force to get to unscrew. DO NOT USE A TORX SCREWDRIVER TO REMOVE THE TORX SCREWS ON THE TOP AND SIDE OF THE HEADLIGHT MOUNT. If i am correct, those two torx screws are what keep your headlights pointed in the correct direction when you re-mount the headlights. I did notice on the drivers side, the bottom left screw (in the aluminum trim) had some wiring that was running in front of it blocking the screw itself but all I had to do was push it slightly to the left and I could reach the screw.
4. Remove the aluminum trim that surrounds the front of the headlights. The lamps should basically fall out but will be held in place with the plug on the back of the bulb. Mine were an absolute pain to remove. I have a gray/black headlight plug and I couldn’t tell if I was supposed to un-click something or squeeze the sides but after about 5 minutes of wiggling the plug back and forth, mine came off and the three prongs on the back of my headlight were freed from the plug.
5. My Hellas came with a rubber cap over the back of the headlight out of the box, but you can remove that cap and it will expose the three prongs that will plug into the wiring harness on each side of your jeep and they should plug right in. Also, if you take a look at the back of the Hella headlight you can see the wire support that keeps the headlight bulb itself inserted into the lamp. Aside from having to remove the entire lamp from the Cherokee, the bulbs should be a piece of cake to remove. I am going to order a second set of bulbs to keep in my vehicle just in case I need to do a bulb change. I don’t know what kind of life I can expect from these new bulbs but I want to be ready should one burn out.
6. To finish instillation, screw the 4 screws back into the aluminum trim that keeps the headlight in its mount.
7. Put the two tabs from each molding piece back into the holes and screw the two screws in on each side of the molding and you are done.
I would recommend that whatever screwdriver or tip you used to loosen the screws from the aluminum that you toss it into the back of your jeep and just remember it is there. It took me at least 6 different phillips heads before I found one that would grip the screw tight enough for me to turn the screw without the risk of wearing off the grooves the screwdriver head goes into. Keeping this tool in my Jeep itself will make headlight changes that much easier in the future.
8. Take your Jeep out someplace really dark and enjoy your new lights. Like I said, I really noticed a big difference with the low beams and the high beams definitely projected down the highway longer than with stock halogens.
I am very happy with this purchase.
Garry Barlow –
Plug and play. Great lighting Great looking. I would highly recommend these. 2003 Jeep TJ