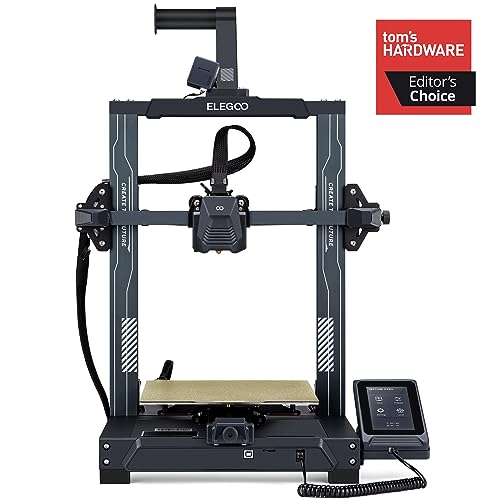
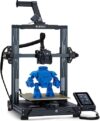
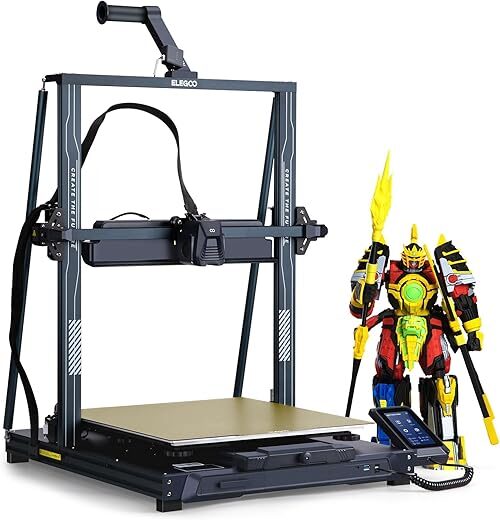
ELEGOO Neptune 3 Pro 3D Printer

Original price was: €399.99.€199.00Current price is: €199.00.
ELEGOO Neptune 3 Pro 3D Printer Price comparison
ELEGOO Neptune 3 Pro 3D Printer Price History
ELEGOO Neptune 3 Pro 3D Printer Description
Discover the ELEGOO Neptune 3 Pro 3D Printer: Your Next Level in 3D Printing
The ELEGOO Neptune 3 Pro 3D Printer stands out as one of the most versatile and reliable 3D printing solutions on the market. It combines cutting-edge technology with user-friendly features, making it perfect for both beginners and seasoned hobbyists. In this product description, we’ll explore its key features, price comparisons, customer reviews, and more. Let’s dive in!
Key Features and Benefits of the ELEGOO Neptune 3 Pro 3D Printer
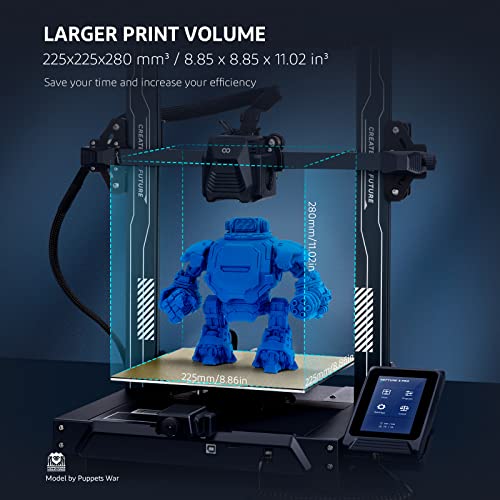
- Large Build Volume: With dimensions of 23 x 9 x 19 inches, you’ll have ample space for various projects, whether it’s a prototype or a creative model.
- Lightweight Yet Sturdy: Weighing only 22 pounds, this printer boasts an aluminum enclosure, ensuring durability without compromising mobility.
- Versatile Compatibility: The Neptune 3 Pro supports multiple operating systems, including Linux and Windows 10, allowing for seamless integration with laptops and personal computers.
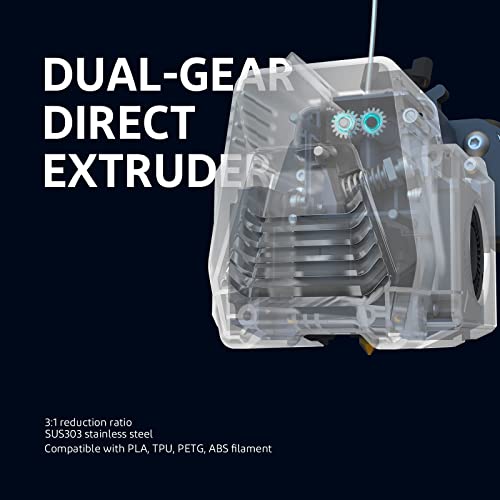
- Advanced Printing Technology: Utilizing Fused Deposition Modeling (FDM), this printer can work with various materials such as PLA, ABS, and TPU, giving users flexibility in their projects.
- Easy Connectivity: Connect via USB for efficient printing management, simplifying your overall workflow.
- Power Efficient: Consuming only 360 watts, this printer is designed for prolonged use without straining your energy bills.
Price Comparison for the ELEGOO Neptune 3 Pro 3D Printer
When considering the ELEGOO Neptune 3 Pro price, it’s essential to see how it stacks up against competitors. You’ll find that many suppliers offer this printer within a competitive range. We provide detailed price comparisons to help you find the best deal possible. Regularly navigating through price changes, you can stay informed about ongoing discounts and sales.
6-Month Price History Trends
The price history chart for the ELEGOO Neptune 3 Pro showcases notable trends, including a gradual decrease in the average selling price over the last six months. This trend indicates increasing competition and consumer interest, which often leads to better deals. By monitoring this trend, savvy buyers can purchase their printer at an optimal time.
Insights from Customer Reviews
Current users of the ELEGOO Neptune 3 Pro have shared extensive feedback on its performance. Here’s a summary of what customers highlight:
- Positive Aspects: Many users praise its easy assembly and intuitive interface, making it accessible for beginners. Additionally, the quality of the prints is often lauded, producing smooth and detailed results with various materials.
- Notable Drawbacks: Some customers noted initial calibration challenges, which can be a common hurdle for beginners. A few users suggest that referring to the included manual or watching online tutorials can greatly assist in overcoming this.
Explore Unboxing and Review Videos
To gain further insights into the ELEGOO Neptune 3 Pro’s features and performance, we encourage you to check out various YouTube review and unboxing videos. These visual presentations showcase real-world applications and can provide a deeper understanding of what to expect. They also demonstrate the printer in action, highlighting setup tips and printing techniques.
Conclusion
The ELEGOO Neptune 3 Pro 3D Printer is a standout choice for anyone looking to venture into 3D printing or upgrade their current setup. With its impressive features, competitive pricing, and solid user feedback, it’s well worth considering. Don’t miss out—compare prices now!
ELEGOO Neptune 3 Pro 3D Printer Specification
Specification: ELEGOO Neptune 3 Pro 3D Printer
|
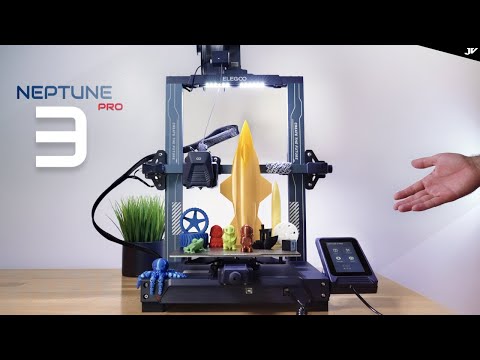
ELEGOO Neptune 3 Pro 3D Printer Videos


ELEGOO Neptune 3 Pro 3D Printer Reviews (8)
8 reviews for ELEGOO Neptune 3 Pro 3D Printer
Only logged in customers who have purchased this product may leave a review.

Grace T. –
Es una buena opción si empiezas a incursionar en el tema de impresiones 3D. Muy fácil de calibrar y operarla.
Grace T. –
Estoy comenzando a aprender a usarlo, tiene la opción en configuración para elegir el filamento que vas a usar y por default maneja diferentes temperaturas para cada cosa, al principio para que esté bien balanceada, debes usar una hoja y calibrarla con las ruedas que tiene por debajo en cada esquina hasta sentir una ligera fricción, atención, no apretar de mas para que la boquilla no raspe el trabajo que vayas hacer y asi no tengas problemas más adelante. Si usas otro modelo sacado de internet busca que este centrado, porque intenté con una espátula pequeña pero se imprimía en una esquina y la impresión falló, pensé que era la máquina, así que imprimí con el poco filamento que quedaba solo la base de otro buda y quedó excelente, así que tenía errores el modelo de la espátula. Es una máquina muy rápida, dependiendo si es mas grande en el programa orca slicer, elegoo cura, que son los que use, viene el tiempo que tardará y los gramos que usará del filamento, más sinembargo es un estimado porque al pasar el USB a la impresora maneja otro tiempo pero no es mucha la diferencia, otra cosa que me gustó es que llega antes, me imagino dependiendo la zona, pero lo bueno es que la caja llegó entera sin daños, todos los accesorios vienen dentro, solo que el manual no venia en español, pero uno lo puede conseguir de la pagina principal de Elegoo.
Michael B. Taylor –
The media could not be loaded.
La verdad muy buena impresora, el paquete llegó de Estados Unidos a México sin problemas. La impresora funciona de maravilla. Buena velocidad de impresión. Una excelente compra sin duda.
Professor Craig Donor –
This 3D printer went together fast. In the box is a USB stick with SD card with videos on assembly and software. Install the Elegoo Cura (thats the program you use to output files onto your SD card to print). Then watch the assembly video if needed, but directions were pretty clear with pictographs.
After assembling I made a few quick test prints and they came out phenomenal with factory settings. To be honest, I had purchased an Ender 3 pro before I got this printer. I was semi- familiar with the process of 3D printing due to this. I’ve had NOTHING but bad luck with the Ender. Wasted TONS of filament and time. This printer hasn’t had a failed print yet… im impressed!
The process of outputting files to your card is called “slicing”. Then that “slice” must be saved to the SD card as a .gcode file. Then you pop the SD card into the Elegoo and navigate to the gcode file and print it. The Elegoo Cura software is the program you can make changes to the model and fine tune the settings. Temperature, speed of print, support structures, thickness of the lines etc. are all done through the cura software. Its fairly intuitive and little info windows pop up to tell you about the area your hovering over…very helpful.
There are a few draw backs to this machine but none would be a deal breaker.
1. The print Head assembly is GIANT. This makes seeing smaller pieces being printed near impossible. The first few layers of a calibration cube for example are dwarfed by the enormous print head. Hard to check adhesion and print quality that way.
2. The slot to insert the SD card is inset into the machine under the front of the build plate. It’s hard to get the card inserted especially for an old fart like myself.
3. You can NOT adjust the e-steps from the display pad. E-steps are the settings we use to “fine” tune the control motors. Y axis, X axis, and Z axis; Y being for and aft, X being right and left, Z being up and down. You can edjust the steps for filament dispensing but not the rest. In order to adjust and fine tune your printers e-steps you’d have to get software to output a programming gcode file. This means you’ll need to learn a new software and programming style. It’s not impossible but this isn’t something you’ll want to buy for gramma at Christmas as she will be lost. Hopefully in the future ELEGOO will update the firmware to include this ability.
As for why it’s important to adjust the e-steps… these control how far a motor is actually moving. Take a calibration cube for example. The dimensions of the finished cube are expected to be 20mm tall X 20mm high X 20mm wide. With an untuned e-step your cube may come out being 21mm X 19mm X 20.5 mm. This may not seem like a big deal, but in the grand scheme of things if we are printing items with threads or a certain diameter to fit into/onto something else we need them to print exact.
Out of the box this printer was within a few tenths of a mm of being dead on. Make SURE to level your bed BEFORE you do anything. The bed must be at temperature and the nozzle at temperature as well. This is not in the instructions. If you set your level with them cold or room temp your plate to nozzle distance will decrease when you start a print. Things expand when you heat them and this will decrease the gap if you don’t pre-heat.
The second thing you need to do after leveling is measure and extrude some filament to set the e-step of the extruder. This will make sure your not pushing too much or too little filament out. Measure 120mm of filament from the top of the print head and make a mark there. Then after preheating the nozzle to the temp your filament needs to melt, command the printer to extrude 100mm of filament. Then measure the exact amount the filament traveled. Use that distance to calibrate your e-steps using this formula… yes you’re going to get math on you.
Your current e-steps programmed in the machine multiplied by 100 (thats the distance we wanted extruded). Take that number and divide it by the actual amount the filament traveled when you measured it. That number will be your new e-step setting.
Once you’ve leveled the bed, and set your filament e-steps your ready to print. My first print was a threaded funnel for my new car. It threads in to where my oil cap is so I wanted to see how precise the prints were. See my pictures. Using default settings the print came out spectacular with nylon filament. True test was threading it into my car… it went right in with no issues.
All in all this is an AWESOME printer. It BY FAR outperforms the Ender 3 pro. I’ve had the printer running non-stop for 4 days now and not a single issue with it. If your willing to tackle a bit of a learning curve with programming e-steps this could be an amazing printer. You will NOT be disappointed.
Professor Craig Donor –
I’m hesitant to write a review after two days, but it’s been in almost continuous operation, and I’m impressed.
I’ve had four printers, two early home-built, an SLA, and this machine. The homebuilts never ran well, and after ten years, I decided to just buy a commercial printer. This machine has impressed me.
Assembly was quick and easy, although having a second person is ideal, the fit and finish is excellent, and the performance is remarkable. The use of extrusions and Acme threads for the Z-Axis create a rigid and repeatable system; this is critical for accuracy. I’m running ASA filament, so I’m worried about the PTFE, but since the Elegoo ASA prints well for me at 245, I’m hoping it holds up with the active cooling.
It requires more than a little bit of learning, and all the calibration required by every machine is still here, but the auto bed leveling is so nice.
Some notes: I wish they had a drop-in all metal hotend. I’ll need it eventually. The poorly named “E-Pulse” menu option is for the E-Steps for the extruder, you’ll probably need to adjust that (although the X/Y/Z seems calibrated from the factory). There is no support for PID on the bed. You can compile a custom firmware from the company, but apparently it makes the LEDs flicker.
Finally, if you’re doing ABS/ASA, just get an enclosure and filament drier now. Check the sizes in the images above, you’ll need to be very selective in enclosures. Attaching an inexpensive ip-cam will allow you to monitor prints without sitting next to the printer all day.
All in all, I couldn’t be happier. I’ll need an all-metal hot end eventually, but that’s not something people using PLA or similar low-temperature filaments would ever need to worry about.
Francisco Torres –
Me gustó que es muy silenciosa, la impresión 3 D muy fácil de manejar
Cumple con lo especificado
Pepe –
Sin duda una impresora fácil de ensamblar y de usar, su calidad es excelente. Quiero ahora la versión plus.
Amazon Customer –
I’ve only had a short time. I have zero prior experience with 3D printing. Once received, I watched many many YouTube videos. Setting up the machine. Using the supplied modified for this machine, Cura software. I have download some EZ to print from Thingiverse. Learned I had to extract the files. Then move the object to print onto the Cura print platform. Sometimes rotate the object on the Cura platform. Slice it, save to a removable microSD card. Make sure to click the pencil icon at bottom left of Cura screen and name it what you want before saving to the microSD card. Then insert card into the printer. I use nozzle temp 220 and plate 70. I only print one object at a time, unless small and I can place very close to each other in the Cura platform before I slice and save to microSD card. The Amolen silk shiny PLA is very nice to print great definition and to remove from plate when finished printing. Let it cool before removing. The Elegoo PLA works, but just not as nice. I use the full auto level between different objects. I try to print 3 of same objects before I do a full re level. I’ve discovered to check nozzle distance to plate after each full leveling. I run a sheet of typing paper under nozzle and adjust so there is a good drag. I first did not adjust nozzle close enough. I learned. I adjusted my Cura for a wide brim for greater adhesion of piece as it prints.watch YouTube for this. I watch carefully first several minutes to be sure the filament is lying down good. If not , i stopped , cleared away the mess, and did full leveling and nozzle distance adjustment. I watched a lot of YouTube videos. Once I decided to spend time in leveling, nozzle distance and set my nozzle and bed temperature up, it’s been really great pieces printed. Watch many YouTube videos as you learn about each aspect. After one or two days commitment to basic learning and adjusting your routine, you will be very happy with this machine. Take the time and learn. This is a great machine and overall satisfying little hobby. UPDATE. I have been using for awhile. GREAT MACHINE. I have printed many different items. All came out great. Make sure your bed heat is high enough and bed is thoroughly heated. Watch the first several layers, get in there with a flashlight. If not laying down perfectly. Stop and clear it out and start over. I’ve only needed to do this twice. This machine is a pleasure to use. Great Great! UPDATE. I’ve been using almost daily, running all night, for a little over 2 months. STILL GREAT. I’ve used ThingIVerse and also bought STL files, from Etsy. Dinosaurs, Astronaut, Furby, Candy dispense using mason jar, squishy turtles, many variations of whistles, Recorder, Bird shaped multi tone whistles, many different key fobs, pull helicopters, lots more, many items. Nozzle 220 and bed 70. Keep nozzle height low, a sheet of typing paper has pretty good friction to pull out, but not too tight either.Now a situation. My nozzle got clogged. I YouTube it. Easiest is replace it. Two extra came with the machine. Extras look inexpensive. YouTube has a very simple method to replace with needle nose pliers and 6mm socket. EZ and quick. Runs perfect after I did that. I think I’ll change that every month, just to be sure I don’t have a clog during a print job. This machine is simple to use. You MUST perform the total automatic re leveling of the bed before each print job. I’ve been disappointed when I skipped this. Great Quiet Simple machine that produces perfect items easily!! You can spend more money, but if you want a simple to use , reliable machine, BUY THIS.