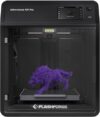
FLASHFORGE Adventurer 5M Pro High-Speed 3D Printer

€599.00
FLASHFORGE Adventurer 5M Pro High-Speed 3D Printer Price comparison
FLASHFORGE Adventurer 5M Pro High-Speed 3D Printer Price History
FLASHFORGE Adventurer 5M Pro High-Speed 3D Printer Description
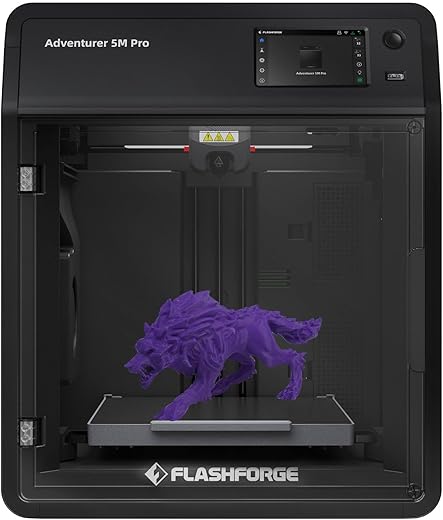
Introducing the FLASHFORGE Adventurer 5M Pro High-Speed 3D Printer
Are you looking for the ultimate 3D printing experience? The FLASHFORGE Adventurer 5M Pro High-Speed 3D Printer is an advanced printing solution designed for both hobbyists and professionals. With impressive capabilities, this printer takes your creative projects to the next level. Whether you’re producing prototypes or intricate designs, the Adventurer 5M Pro provides the speed and precision you need. Discover why this printer is trending in 2023!
Key Features and Benefits of the FLASHFORGE Adventurer 5M Pro
- Compact Design: With dimensions of 14.96 x 15.74 x 17.83 inches and a weight of just 32.1 pounds, this printer fits neatly into any workspace.
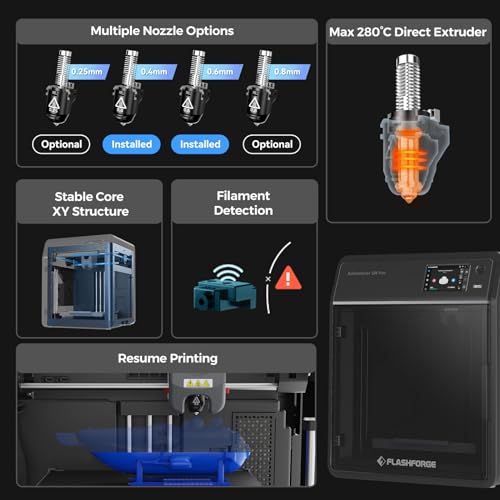
- Versatile Material Compatibility: The Adventurer 5M Pro supports a variety of materials such as PLA, PETG, ABS, and TPU, allowing you to explore different textures and applications.
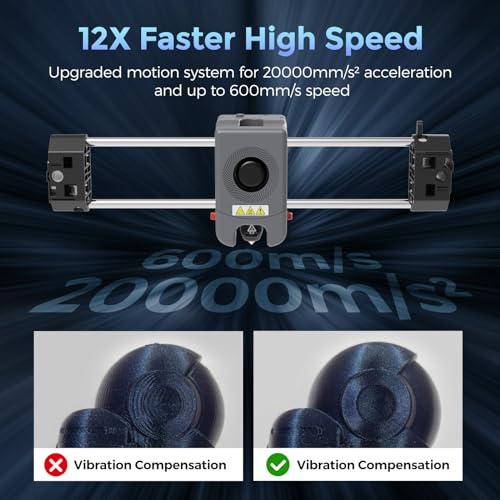
- High-Speed Printing: Experience rapid printing without sacrificing quality. The FDM technology ensures smooth and precise outputs across multiple layers.
- Multiple Connectivity Options: Print wirelessly with Wi-Fi, or use USB, Cloud, or Ethernet for a flexible approach to your printing needs.
- Robust Operating System Support: Compatible with various operating systems including Linux (Ubuntu 20.04 and later), Mac OS (10.9 and later), and Windows (7/8/10/11), the Adventurer 5M Pro seamlessly integrates into your existing setup.
- Input and Output Flexibility: Support for various file formats like 3MF, STL, OBJ, and more, provides you with the versatility to work with any design you create.
Price Comparison for the FLASHFORGE Adventurer 5M Pro
This amazing 3D printer is available at competitive prices across multiple suppliers. Prices typically range from $799.99 to $899.99, making it an attractive option for anyone looking to invest in high-quality 3D printing technology. With the ability to compare prices easily, you can find the best deal that fits your budget.
6-Month Price History Analysis
The price history of the FLASHFORGE Adventurer 5M Pro has shown some interesting trends over the last six months. The average price has gradually decreased, highlighting a growing demand for affordable 3D printing experiences. Potential buyers can benefit from this trend and find competitive pricing as retailers adjust to market needs.
Customer Reviews: Highlights and Concerns
Customer feedback is essential when considering a new purchase. The FLASHFORGE Adventurer 5M Pro has generally received positive reviews. Users praise its reliability and ease of use, especially for those new to 3D printing. Many appreciate the quick setup time and multiple material compatibility. However, a few reviewers noted concerns around the printer’s noise levels during operation, which some found distracting. Overall, customer satisfaction rates are high, thanks to the printer’s robust features and performance.
Explore Unboxing and Review Videos
For a closer look at the FLASHFORGE Adventurer 5M Pro, check out various unboxing and review videos available on YouTube. These videos showcase real user experiences, tips, and tricks that can help you maximize your 3D printing journey. Watching these reviews can provide deeper insights into what to expect from this impressive machine.
Why Choose the FLASHFORGE Adventurer 5M Pro?
If you’re searching for a user-friendly, high-performance 3D printer, the FLASHFORGE Adventurer 5M Pro is the ideal choice. Its cutting-edge technology, coupled with versatile features, caters to a wide range of 3D printing applications. Whether you’re crafting prototypes for your business or creating stunning designs for personal projects, this printer meets your needs.
Get Started with Your 3D Printing Journey
Don’t miss out on the opportunity to elevate your creative projects with the FLASHFORGE Adventurer 5M Pro High-Speed 3D Printer. Compare prices now and make an informed choice that aligns with your expectations and budget.
FLASHFORGE Adventurer 5M Pro High-Speed 3D Printer Specification
Specification: FLASHFORGE Adventurer 5M Pro High-Speed 3D Printer
|
FLASHFORGE Adventurer 5M Pro High-Speed 3D Printer Reviews (7)
7 reviews for FLASHFORGE Adventurer 5M Pro High-Speed 3D Printer
Only logged in customers who have purchased this product may leave a review.


Frank W. –
Short Story: I purchased the FlashForge 3d Printer Creator Pro in mid December 2014 and started using it on December 25th. I have printed ABS things that came with it, an ABS bicycle I created with SketchUp, and a wrench using PLA glow-in-the dark filament. Everything works great. This is a fantastic machine and technology. And I had a couple of questions and the legendary Tang answered the first email within an hour on Christmas Eve and the second email within an hour on Christmas morning (Central Standard Time). Great product, great service and the concept of 3d printing is really cool.
Long Story: I got interested in 3d printing about a year ago and began shopping and reading web sites. I noticed that the machines were getting less expensive and per the reviews, more reliable. In early December I decided it was time to buy one and I suggested to my wife that I was going to do this and ‘it could be my Christmas present’. She said that was fine, but I could not open it until Christmas day. That was not what I intended but it turned out to be a good thing. For the 3 weeks or so before Christmas I read everything I could find about how to set up and use this printer.
The first thing I discovered is that there is a lot of software involved, and three ways to get objects to the printer. First, you can download files from the internet. Second you can create an object then print it, and third you can buy a scanner, scan an object, and then print it. And you can combine elements of all of those. You could download a file, merge that with something you scanned, and then import that file into a 3D modeling software like Google SketchUp and modify it.
I’m a baby boomer and we all learned things by reading the manual. Kids today never bothered with manuals so when they started inventing all this stuff they don’t bother writing manuals. You have to figure everything out by reading Customer Reviews and researching on the internet.
Scanning. I purchased a Matter and Form MFS1v1 3d scanner. I wrote a review about it, so won’t repeat that here. It works.
Create a Model of your own design. You have to learn to use a software program to do this. I selected SketchUp because there are good reviews and it is free. But there are no manuals. You load it on your PC, then work through 4 training tutorials provided by Google, then you just have to do google searches to try to figure out everything else you need to know to create an object that you can print.
Here is what I learned about SketchUp essential to 3D printing:
1. Build your object in a large size, then let the printing software (more on that later) reduce it in size. SketchUp was developed as a 3d tool for architecture and lacks the ability to make very tiny parts. But you can make a big part with high detail then reduce it.
2. Every time you create an object on SketchUp – you must select it then “make a group”. Then you right-click and look at ‘Entity Info’. If you see ‘volume’ you have created a solid that will print on a 3d printer. If you try to print something that is not a solid the print software will discover “manifold” problems, and the print won’t work.
3. After you create solids, you join them together using a tool called “outer shell”. This is the tool on SketchUp 2015. I think tools on earlier versions had other names. You get to this tool by: View, Toolbars, Solid Tools. A bunch of solid objects joined together with ‘Outer Shell’ result in a model that can be printed.
4. When you first download Sketchup you get the Pro version (for 30 days). With the pro version you get other Solid Tools and you can output ‘object’ files. I got so frustrated that I could not get objects to print properly (just using the print preparation software – see below) that I bought the Pro version. I now don’t think you need it. The free version will output STL files and the Print Prep software can use either an “STL” file or and “OBJ” file
5. When you are finished building your object – export it as on OBJ file or Export it as an STL file. To export as an STL file you have to add the STL functionality to your SketchUp program. Again, just Google: “Add STL to Sketchup” and you will discover how to do this
Convert your File to a Print File: Next – you prepare your file to print. This is required regardless of whether you download a model from the internet of use a model you created from SketchUp. You must have software that is capable of creating a file in the format expected by your printer. The Print File provides all the info the printer requires heat the extruders, move the print bed, move the extruders, push out the plastic, and so on.
The directions that come with this printer instruct the user how to download free software and install it – along with other programs and drivers and so on. I found this baffling and for $140 bought Simplify3D, which is an alternative to the free software. Simplify3D has about 9 tutorials that explain how to use it. Remember, I’m killing time until Christmas and working through these was very helpful.
When you first launch Simplify3D you tell it the brand and model of your printer. Then, as you import the model you either created or downloaded, the software has preconfigured processes to facilitate printing. You can change all these but I found the defaults to work great. When you are ready to print the software shows you an extruder suspended in space above a print bed and it prints your model, on your computer screen. You can watch it and use the “repair” menu to find all the problems – before even using the actual printer. When you have the model printing correctly on your PC, you move the file to the actual printer.
But this is the cool thing – if you are thinking about buying a 3D printer – get SketchUp and buy Simplify3d. Make some models; see how they print. You can learn an awful lot before making the leap to buy the printer.
Now to the FlashForge
It came, from Amazon, in two days. It was packed well and everything was in it.
The instructions for assembly are clear – but I also found a video of how to assemble a slightly older version that was helpful.
This version includes an acrylic cover and front door that help keep the temperature constant which is useful for ABS printing. The instructions that come with the printer provide a web site with a video that shows how to assemble the acrylic cover that goes on the top of the machine. Hint: Take all the protective paper off the acrylic, use some of the painters’ tape that comes with the printer to tape the acrylic pieces together, install the screws, and remove the tape. This is a lot easier than the process in the video.
It took 20 minutes and a lot of patience to get the print bed level. I finally settled on this procedure – Launch the ‘Level Build Plate’ on the printer, push the extruder assembly until it is right above the leveling wing-nut closest to you. Adjust that wing-nut until paper just barely slides; move extruder until it is above the other wing nuts and do the same thing. You just push it with your hands. Keep moving the extruder and adjusting the wing nuts until paper just slides, anywhere on the bed.
Printing was the easiest part. First, I printed the objects that are on the SD card that comes with the machine. These printed fine. I was a little impatient getting the first print off the print bed, which has a layer of Kapton tape. I used a sharp knife from the kitchen to pop the model loose and actually cut into the tape. So on every subsequent print there is a little flap of Kapton tape sticking up. Note, however that when you use the Printing Software (in my example Simplify3D), you can check a box for “Include Raft”. When you do this, the printer creates a lattice of plastic under your actual object. That lattice just peels right off when finished. And the lattice covers up the Kapton tape tear and minor imperfections in levelling.
Then I moved to printing from my PC. I could not load the driver necessary to connect my PC directly to the printer – but just copied ready-to-print files from Simplify3D to the SDCH card that came with the printer. Then put the SDCH card in the printer and it works fine.
ABS. First 10 prints were using the ABS filament that came with the printer. I had studied all the settings and variables available to control the print – but when it came time to do it I just told the Simplify3D software that I was using ABS and wanted a ‘raft’ and everything came out fine. NOTE regarding “Supports”. The reason I bought a two extruder printer was because I thought you needed a second extruder to generate ‘supports’ for parts with a big overhang, using one of those soluble plastics that can later be dissolved. It turns out that the Simplify3D software (and probably most others) can print ‘supports’ just using the same ABS spool as your model. Somehow the supports are printed so they don’t stick very much and they just break off. The only time you would really need soluble supports is if they had to be printed inside your model where you could not easily remove them.
PLA. Same story (almost). I backed out the ABS filament and loaded some PLA (that actually glows in the dark!). Everything had been printing so smoothly on the Kapton tape that I just told Simplify3D I was using PLA – and printed! I did not bother to use the Painters’ Tape as instructed because that would require re-leveling the print bed. The PLA print on the Kapton tape worked fine for about 10 minutes then the entire RAFT pulled loose and got caught against the extruder and I was not watching closely and a LOT of PLA got gummed up on the end of the extruder. Cleaned it up, installed a couple strips of painters’ tape, re-leveled and it prints fine. LESSON: follow the instructions.
This machine and all the software are really fun. About the equivalent to a two hour college course, I think. I highly recommend this machine and the company that backs it up.
11/5/2018 Update: I have had this machine for 4 years. I had to replace the print nozzles when they got too clogged, and I NEVER use the dual nozzle feature but this machine is a champ.
11/16/2023 Update: That machine finally wore out. I could have emailed the vendor and purchased parts but I like the printer so much I just bought a new one. And meanwhile about 4 years ago I bought another one for a different house. I’m convinced this printer is the best one available. Sketchup (mentioned above) is much better now and it works great for 3d parts.
One more suggestion: Use klapton tape on the bed and clean it every time with acetone. Replace the tape when it wears (maybe every 10 prints or so) and after removing the worn out tape clean the bed with alcohol.
Strength: I bought a boat in 2017 that has an 8’ x 8’ Bimini top (big heavy monster). I got 2 Linco lifters and created brackets with this printer (and ABS+ plastic, 10 layers) to print the brackets that connect the lifters to the boat and to the top. Total force on these plastic brackets is about 100 lbs! This thing has worked flawlessly (use it to get the boat under a bridge) for 7 years now. One bracket cracked so I just pushed the button on the printer and made another one.
hector b. –
Don’t waste your money! This 3D printer is a load of rubbish. It looks the part. But, when it starts to print. It then starts to shred all over it’s self. It drags over where it’s already printed and pulls it all off of the base plate and drags it everywhere. It leaves a right tangled mess. I tried to get a refund after having it for only a week. Oh no, I am being charged to send the bloody thing back. It’s very heavy, so it’s gonna cost a fortune to send it back. I am not paying it. Why should I pay for a crap and faulty machine to be sent back. Amazon you need to stop letting 3rd party sellers from taking advantage of your loyal customers, it’s daylight robery. I pay for prime, like most people on here do. Why should I pay again for postage? It’s just not on at all. I have no idea where the higher up positive feedback comments are coming from for this printer at all. Most of the ones I have seen slightly further down are 100% negative. Get rid Amazon….
Udo Meeßen / TrashHunter –
Esta es la primer impresora 3D con la que tengo oportunidad de trabajar, pero la segunda que tengo. La primera fue una Robo C2, pero le falló la pantalla desde que la desempaqué. Así que la regresé. A diferencia de la otra, esta hay que nivelarla manualmente, que no es un proceso complicado, pero sí necesario y hay que ensamblar la unidad de extrusión y el ducto del abanico. Mi hijo y yo hemos hecho 6 impresiones en PLA en 2 semanas, desde 15 mins hasta 2 hrs y no ha fallado una sola impresión. Sí invertimos en el programa “slicer” Simplify3d, que es muy potente y versátil, por recomendaciones que vimos en internet. Hicimos una impresión de dos colores y una en modo copia, donde un extrusor imprime lo mismo que el otro simultáneamente y todo ha salido muy bien. También es importante invertir en alguna herramienta para separar las impresiones de la plataforma, porque al usar un desarmado de precisión corté el tapete y tuve que usar el de refacción, pero con una espátula no se batalla nada. En mi opinión, muy recomendable.
Gicho –
Buenas guías, calidad está bien, poco desperdicio
Dee Hamilton 75 –
It was very simple to set up after watching a guide video online. This is the first printer i have owned, and I have now had the machine for about a month and almost everything i print now comes out exactly as it should. There was a bit of a learning curve but here is my pros and cons list.
Pros:
-Easy set up, and feels well manufactured.(I haven’t replaced everything, but i have disassembled the printer head and it appears to be easy to maintain and replace parts)
-2 nozzles! Printing things from 2 materials in one print is amazing.(I use simplify 3D as my slicer, and the dual extruder wizard is fantastic and very simple to use)
-The interface is very simple to use and intuitive. Only bug i have noticed is that you have to go to”print from SD” twice because the first time you try to go to the SD card files after plugging the SD card in it says “SD card error”. really only wastes like 1 second of your time though.
-The software seems to be compatible with almost any slicer software from what i have heard.
-It is an enclosed chamber which makes it capable of working with pretty well any type of plastic out there
-Seems to be very solidly and durably built. I’m expecting that this machine will go for at least a few years with proper maintenance.
-It just works well and consistently with minimal fiddling around with stuff.
Cons:
-The spool holders. They are located on the back, and designed to only use the proprietary brand(all other brands slide right off as the holders are not big enough). Luckily you now have a 3D printer and can easily print out new ones(That fit where the old ones did or some cool freestanding ones you can move wherever you want)
-Build volume. If I had this machine, but scaled to be able to print with a bigger volume, it would literally be the perfect machine for me.
-It is very very loud. I bought a cabinet and lined it with sound dampening material to house it because it is loud enough to keep you up at night from the next room over.
-Leveling the bed. Using the bed leveling assisting software on the SD card did not work very well for me at all. I eventually got it figured out by adjusting the bed as it printed the first layers of prints(once you hit that sweet spot though MY GOD do the quality of the prints, and the bed adhesion skyrocket)
-I upgraded the bed with a borosilicate glass plate and wow does that make a huge difference! I wish the printer came with one. it is an absolutely necessary upgrade if you want to print with ABS and several other materials.
To summarize, I am very happy with it, and as someone new to the hobby it has been well worth the money. It is a well built machine, and especially if you are new to the hobby this is a easy one to use that will give you minimal headaches.
Dee Hamilton 75 –
Meinen ersten 3D-Drucker habe ich nach sieben frustrierenden Wochen zurück gegeben, weil absolut nichts funktionierte. Dnach suchte ich erneut nach einem Dual-Extruder, weil ich viele filigrane Teile drucke, welche viele Stützstrukturen benötigen und ich diese Stützen aus wasserlöslichem PVA drucken will, um sie einfach abzuwaschen und mir das Entfernen mit Messer, Seitenschneider und Feilen zu ersparen.
Meine Wahl fiel auf den Creator Pro und der kam nach nur drei Tagen optimal verpackt bei mir an. Schon das Auspacken und das Herstellen der Betriebsbereitschaft waren eine helle Freude, weil man lediglich fünf Schrauben einsetzen, bzw. kurzfristig lösen, und drei Kabelbinder entfernen muss. Die beiliegende Anleitung zum Auspacken ist perfekt gestaltet und im Zweifel hilft ein Video auf der mitgelieferten SD-Karte.
Nach dem Auspacken und Herstellen des Grundzustandes hilft ein auf der SD-Karte mitgeliefertes kleines Programm beim Nivelieren des Druckbettes und siehe da… der Drucker wird offenbar schon ab Werk nahezu optimal niveliert, denn ich hatte das Druckbett schon nach weniger als zwei Minuten ideal eingerichtet.
Auf der SD-Karte sind Testdateien für den Druck nur mit rechtem, nur mit linkem und mit beiden Extrudern, um deren Funktionalität zu prüfen. Alle drei Drucke wurden von Anfang an PERFEKT.
Anders als bei anderen Drucker, welche sich als Slicer-Software auf Cura oder das total veraltete Repetier verlassen, kommen die Geräte von FlashForge mit einer hauseigenen, auf diese eingerichtete Software zum Benutzer und dadurch wird das Arbeiten / der Spaß mit Software und Drucker zum Kinderspiel und Vergnügen.
Der Creator Pro macht, was ich will und beschert mir keine Alpträume. Beim vorherigen Drucker ging ich ins Bett, hoffte es würde funktionieren und bekam Stunden später wieder einen Schock, weil immer und immer wieder nur Mist produziert und Filament sinnlos verbraten, zu Müll, wurde.
Dem Creator Pro sage ich, was ich will, starte das Drucken und lasse ihn danach auch durchaus mal 24 Stunden unbeaufsichtigt. Das Resultat war bislang IMMER dasselbe… Perfekt.
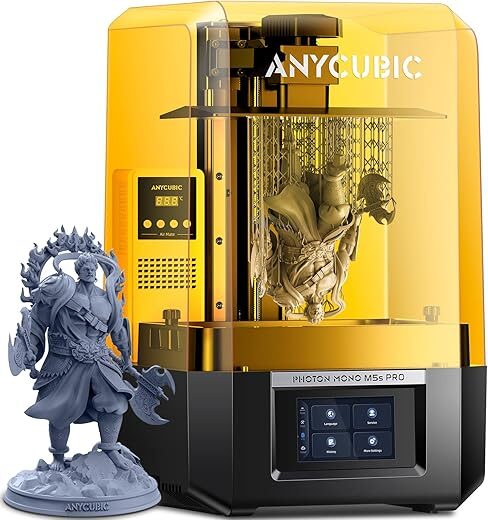
Die in den Bildern gezeigten Schwert-Träger wurden mit PLA gedruckt. Mit dem anderen Drucker waren die Teile NICHT in der Lage, das Gewicht meiner Katanas, Wakizashis und Tantos zu tragen und zerbröselten. (Wenn sie überhaupt fertig wurden und der Drucker nicht nur Mist baute und Filament zu Plastikmüll verarbeitete.)
Wie in den Bildern zu sehen ist, tragen die mit demselben PLA mit dem Creator Pro gedruckten Schwert-Träger meine Schwerter problemlos. Diese handgeschmiedeten japanischen Klingen aus 12-fach gefaltetem Kohlenstoffstahl sind KEINE Deko, sondern echte, scharfe Waffen, welche dementsprechend Gewicht haben und die mit dem Creator Pro gedruckten Konstrukte tragen diese dauerhaft ohne Probleme.
Ich bin vom Creator Pro absolut überzeugt und ich denke, ich kann ihn auch an Einsteiger empfehlen, weil der Benutzer mittels Aufbauanleitung, Handbuch und mitgelieferter Software intuitiv erfolgreich geführt wird und auch der Laie sehr schnell zu befriedigenden Ergebnissen kommen kann.
Frank W. –
After quite a bit of comparison shopping and research I purchased one of these for work. It was my first experience with a 3D printer, so I was starting from an absolute newbie perspective. The printer arrives in a very plain brown box, and other than the size and weight (and the fact that you’re expecting it), you’d never know what was inside until you open the box.
Setup is a breeze, but be sure to look at the owners manual before you begin trying to get the packing foam out of the interior. It will make things much easier. Setup, leveling the print bed, loading of the filament (comes with two spools of ABS), and test print (the little traffic cone) is very easy. You’ll be surprised at how well it prints and the quality of the finished product. I’ve seen 3D printed models (both online and in person) in the past, and they were not very good. I have to say that after using this printer and seeing the quality of the output, I have been very impressed.
After a few weeks of using this at work I liked it so much that I purchased one for my home. Since then we have printed everything from bird houses to doorstops and many other things. I’m now printing a drone. Besides ABS (which I use most of the time), I’ve also purchased and printed with PLA and PETG. PETG would be what you’d want to use if you intend to make and use something that comes in contact with food or liquids (I used it for a bird feeder).
Since I had to learn all of this the hard way, I’ll give you a few pointers that hopefully will save you some time. For what I was doing at work I needed to create my own 3D models. After looking at all the options I went with Blender. It’s open source, free, and has a huge support community so you can find answers quickly. Blender is not intuitive, but it is very much worth learning. Search YouTube for Blender and you’ll find plenty of tutorials. The first few days are frustrating, but after you begin to figure out how to use Blender, you’ll be hooked. I’ve made some amazing things after learning Blender.
The next software I would recommend is Simplify3D. It works great and is very easy to learn and use. Why do you need this? Whether you download a model (.stl file) from Thingiverse or create a model in something like Blender (which you would then export as an STL file), you need a way to get that STL file converted to gcode for the printer. The printer comes with some software for this, but in my opinion the included software is nowhere near as powerful or complete as Simplify3D.
Simplify3D does all the work and makes it super easy to go from STL to printer. You basically open an STL file, view it in Preview Mode, and then export it (save it) to the SD card that goes in the Flashforge Creator Pro. That’s it. Simplify3D has a lot of options you can play with if needed (most of the time you don’t). This software costs $149, but I would recommend purchasing it. It will save you tons of headaches and you’ll be printing very quickly and easily.
Before I forget, this is the 2016 model of Flashforge Creator Pro. I didn’t know they had a different model before 2016, so if you download and print an add-on (see below) for the printer, be sure you’re downloading something for the 2016 model, otherwise it may not fit after you print it (I found that out the hard way)
Once you are printing, I would suggest downloading and printing two “add-on” parts for the Flashforge printer (neither of these are my designs, I just found them on Thingiverse):
1. Filament Feeder (http://www.thingiverse.com/thing:1582238). This makes it much easier to load/unload the filament, and keeps it better aligned with the center of the filament reel.
2. Universal Filament Holder (http://www.thingiverse.com/thing:1641112). You’ll need one of these because not all filament spools are the same width, and many will not fit on the hubs supplied with the printer. These are simple to use and can be swapped for the ones that come with the printer in about 10 seconds. They mount exactly like the ones supplied (requiring no tools… simply hangs on the back like the factory ones).
There are many variants of both of these add-ons on Thingiverse. I personally have printed and use these, so I can vouch for them. They work just fine, but I’m sure others would work equally well.
The last thing that I would highly recommend is replacing the blue print bed platform sticker that comes with the printer with a glass plate. After having used the blue sticker for about a month, and then switching to glass, I still can’t figure out why they wouldn’t ship the printer from the factory without a glass print bed. In my opinion glass is far superior. I don’t need a scraper of any kind to remove a print. It simply cools and pops right off. I use a light coating of Aqua Net hairspray on the glass (wiped off with a paper towel after spraying) before printing. This makes the glass sticky so the plastic will stick while it is printing. As soon as it prints and cools, however, the part will pop right off without even prying. The glass bed kit that I purchased (from Amazon) is borosilicate glass that is cut to the right size for this printer (220mm x 150mm x 5mm high). The kit I purchased was from Makersome. There are two corner brackets (part of the kit) that mount on opposite corners of the print bed and the glass plate simply sits on there. The beauty of this design is that as soon as I print something I can lift the glass plate out (usually with a pot holder because it is hot), and set the glass on the granite counter top. It cools very quickly (1-2 min) and the part literally unsticks itself.
Instead of hairspray I have also used an ABS slurry by mixing ABS scraps with some acetone (must use a polypropylene spray bottle for that) and spraying and wiping it off the glass. I’ve done both, but I get the same results with hairspray with the bonus that it is much more convenient and it is clear so it works with any color ABS I’m printing.
I clean the glass between printings with just dish soap and warm water. When I’m ready to print something else, I simply spray on (and wipe off) the hairspray and print again.
Hope this helps, and enjoy printing. The Flashforge Creator Pro is a great printer.